
Plenty of people floss every day and still are not cleaning between their teeth effectively. Sliding floss into a gap and pulling it back out is not the whole technique, even though it is what most of us default to.
Effective flossing means cleaning the side of each tooth on either side of that gap, and gently reaching the area just below where the gum meets the tooth. That is a different motion than simply passing floss through the space once. None of this requires perfect form. A few adjustments to what you are already doing make a real difference.
Why Does Flossing Technique Matter?
A toothbrush cleans the front, back, and chewing surfaces well. It cannot reach the tight space between two neighboring teeth, which collects plaque just as readily as any other surface. Interdental cleaning exists specifically to reach it.
The goal is to physically disrupt and remove that plaque from the sides of both teeth and from just beneath the gumline, not to move a strand of floss up and down once and call it done. A single quick pass through the contact point without curving against each tooth surface leaves plaque behind on exactly the surfaces you were trying to clean.
How to Floss Properly Step by Step
1. Use enough floss
A common recommendation is to break off around 18 inches, winding most around one middle finger and the rest around the other to take up used sections as you go. The exact length is not a strict requirement. The point is having enough to move to a fresh section for each space rather than reusing the same few inches across your whole mouth.
2. Hold the floss correctly
Pinch the floss tightly between your thumbs and index fingers, leaving about an inch of working length between your hands. This gives you the control to guide it precisely rather than letting it flop around.
3. Guide the floss gently between your teeth
Ease the floss through the contact point with a gentle back-and-forth motion rather than forcing it straight down, and never snap it into place. If it keeps catching or shredding at a particular spot, try a slightly different angle rather than pushing harder. A contact that resists every attempt is worth mentioning to your dentist.
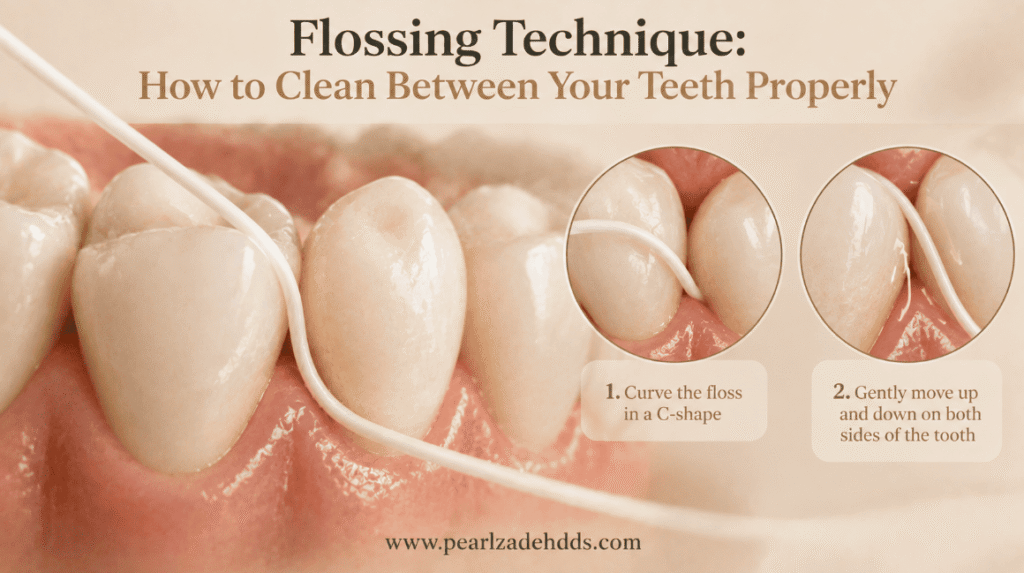
4. Curve the floss around one tooth
This is the step most people skip, and it is where the actual cleaning happens. The ADA’s own instructions describe it precisely: when the floss reaches the gumline, curve it into a C shape against one tooth. Instead of keeping the floss stretched flat across the gap, wrap it around the side of a single tooth so it follows the tooth’s actual curve.
5. Clean along the side of the tooth
With the floss curved into that C shape, gently rub it up and down against the tooth surface, following its shape. This is what physically lifts plaque off the tooth rather than just passing by it. Both teeth bordering the gap need this same attention, not just one.
6. Gently reach below the gumline
Slide the floss slightly into the shallow space between the tooth and the gum tissue, holding it against the tooth and slightly away from the gum itself as the ADA describes. A light touch is all this takes. You are not digging into anything; you are letting the floss follow the natural curve of the tooth a small distance below where the gum meets it.
7. Repeat on the other tooth
Reposition the same section of floss into a C shape against the neighboring tooth and repeat the up-and-down motion there too. One pass through a single gap means cleaning two tooth surfaces, not one. Then move to a clean section of floss and the next gap, working all the way around, top and bottom.
How Should You Floss Your Back Teeth?
Molars get skipped more than any other teeth, mostly because reaching them comfortably takes more coordination. Working slowly and using shorter, more controlled movements tends to work better than long sweeping motions once you are that far back.
If your fingers do not fit comfortably that far in, a floss holder or pick can make back teeth easier to manage without changing what the floss needs to do. A mirror helps some people see what they are doing; others find it easier by feel alone. Dexterity varies enough between people that what works for one may not suit another.
How Much Pressure Should You Use?
Less than you might think. Effective flossing removes plaque through gentle, repeated contact against the tooth surface, not through force. Pressing hard or sawing the floss back and forth does not clean better. It is more likely to injure the gum tissue.
The difference to aim for is gentle contact with the tooth and the gumline, not forcing floss into the tissue itself. If a motion feels like it requires real effort to push through, that is a sign to ease up or adjust your angle, not to press harder.
Should Floss Go Under the Gums?
Yes, gently, into the shallow space that naturally exists between a healthy tooth and the surrounding gum tissue. That is a normal, small space, not something you are creating by flossing.
This is not the same as pushing floss deeply into gum tissue or forcing it toward the bone. If you have periodontal pockets or existing gum disease, the appropriate depth and technique may be different from what works for healthy gum tissue, and that is worth discussing with a dentist or hygienist directly rather than guessing at how deep is too deep.
Why Do My Gums Bleed When I Floss?
Several things can cause this, and it does not always mean the same thing. Gum tissue inflamed by a plaque buildup tends to bleed more easily when finally disturbed. Restarting a flossing routine after a gap can produce bleeding for the first several days simply because the gums are reacting to attention they have not gotten in a while, and this often settles as tissue adjusts. Technique that is too aggressive, snapping floss or sawing at the gum tissue, can cause bleeding on its own. Existing gum problems can too.
Bleeding is not automatically normal, and it is not automatically a sign of disease either; it depends on the pattern. Occasional light bleeding when you resume a routine is different from bleeding that persists week after week, or that comes with swelling, tenderness, or gum recession. Our overview of early signs of gum disease covers what patterns are worth having evaluated rather than waited out.
Should You Floss Before or After Brushing?
The ADA’s own position is direct: as long as you floss thoroughly, it does not matter when you do it. The most important thing is making it a daily habit at a time you will actually keep up with.
A small 2018 randomized trial of 25 dental students found flossing before brushing significantly reduced interdental plaque and left more fluoride in contact with those areas. But a 2021 systematic review and meta-analysis pooling this evidence found no significant overall effect of sequence on plaque reduction. Individual small trials and the pooled analysis do not agree, which happens when a body of evidence is still thin. Given that, the ADA’s practical position, that consistency matters more than order, is the more useful takeaway.
How Often Should You Floss?
Once daily. That is the consistent recommendation across dental organizations, and it holds regardless of how clean your teeth look or feel on a given day. Plaque forms continuously, not just after meals that leave visible debris, so teeth that look and feel clean can still have plaque built up between them that a toothbrush never touched.
What If Traditional Floss Does Not Work for You?
String floss is not the only tool for this job, and it is not the right fit for everyone. Interdental brushes, small bristled tools sized to fit between teeth, water flossers, which use a pressurized stream of water, and floss picks, a pre-strung holder, all serve the same basic purpose through different mechanisms.
The evidence does not point to one universal winner. A recent review of interdental cleaning research found moderate-quality evidence supporting interdental brushes for reducing plaque, alongside weaker evidence for water flossers on gingivitis scores specifically. A separate, more recent systematic review, rated at low certainty, reported that interdental brushes may be more effective than string floss in some comparisons. Weaker or lower-certainty evidence does not mean a tool does not work; it means fewer or less consistent studies have measured it.
What actually fits best depends on your own situation: interdental spacing, gum health, orthodontic hardware, dexterity, and which tool you will actually use daily. A well-fitting device used consistently beats a technically ideal method left in a drawer.
Flossing With Crowns, Bridges, or Other Dental Work
Having dental work does not mean you should stop cleaning between your teeth. It can change which tool fits best. A bridge has a section without a natural gap the way two separate teeth have, and a floss threader or bridge floss can get underneath the connecting piece where ordinary floss cannot.
Tight contacts around crowns, or hardware from braces, can make interdental brushes or floss threaders more practical than standard string floss. Not every restoration requires a special device; many people floss around crowns and bridges with standard floss without issue. If unsure what fits your dental work, that is a reasonable question for your next visit.
Common Flossing Mistakes
Snapping floss into the gums rather than easing it through. Cleaning only the empty space rather than rubbing floss against both tooth surfaces. Skipping the back teeth. Reusing the same dirty section across your whole mouth instead of advancing to a clean part. Moving too quickly to actually disrupt plaque. Stopping entirely the first time gums bleed, rather than continuing gently. Using more force than needed. And not adjusting technique or tool when tight spacing or dental work makes the standard approach genuinely difficult.
What If Floss Keeps Getting Stuck or Shredding?
A few things commonly explain this: very tight contact points that naturally resist floss, rough edges on an older filling or crown, irregular or overlapping tooth surfaces, or simply a damaged or low-quality strand of floss.
If one particular spot repeatedly shreds floss no matter what you try, that is worth mentioning to your dentist rather than working around it indefinitely, since it could point to something at that specific spot worth a look. Forcing floss through a catching spot risks snapping it suddenly against the gum, exactly the motion to avoid.
Can Flossing Damage Your Gums?
Gentle, controlled flossing is not something to treat as inherently harmful. Aggressive technique, snapping floss or sawing it hard against the gum line, can genuinely irritate or injure gum tissue over time. The difference is almost entirely in the motion, not in the act of flossing itself.
Correct technique matters more here than avoiding interdental cleaning because of occasional bleeding or mild tenderness. Backing off from flossing altogether because it is uncomfortable at first tends to make the underlying inflammation worse, not better, since the plaque causing that irritation is still building up untouched.
Is Flossing Enough for Complete Oral Hygiene?
No, and it was never meant to stand alone. Interdental cleaning is one part of a broader routine that includes brushing twice daily with fluoride toothpaste, regular dental visits, and paying attention to how often you expose your teeth to sugar. Some people also add tongue cleaning or a product like xylitol gum to that routine, though neither replaces the fundamentals. Your individual cavity and gum-disease risk also plays a role in what a complete routine should actually include for you specifically, which is part of what a dental visit is for.
Get Personalized Guidance on Your Routine
Effective interdental cleaning comes down to technique, consistency, and choosing a method that actually fits your teeth and gums. String floss works well for many people, but it is not necessarily the right tool for everyone, and there is no need to force it if something else fits your mouth better.
Dr. Pearl Zadeh can look at your specific teeth, spacing, and gum health, and help you figure out which interdental cleaning approach actually makes sense for you.
Call (818) 716-6722 or click the button below to schedule an appointment and discuss your oral health needs.
Frequently Asked Questions
Guide floss gently between your teeth, curve it into a C shape against one tooth, and rub it up and down along that surface and slightly below the gumline. Repeat on the neighboring tooth before moving to a clean section for the next gap.
Yes, gently, into the small natural space between a healthy tooth and gum. This is different from forcing floss deep into the tissue, and depth may need to be adjusted for someone with gum disease.
Gentle pressure. Effective flossing comes from controlled contact with the tooth surface, not force. Pressing hard or sawing the floss increases the risk of irritating gum tissue without cleaning any better.
Plaque-related inflammation, restarting a routine after a gap, overly aggressive technique, or existing gum issues can all cause it. Occasional light bleeding often settles within days; bleeding that persists or comes with swelling is worth having evaluated.
The ADA says the order does not matter as much as doing it thoroughly and consistently. Some individual studies favor flossing first, but a systematic review pooling that research found no significant overall difference.
This article is for informational purposes only and is not a substitute for professional dental advice. Please schedule a consultation with Pearl Zadeh DDS to discuss your specific situation.